


The 'How To' Styling Series - Open Shelving
There are a few different types of people when it comes to open shelving.
The ones who thrive with a blank canvas, experiencing little sparks of joy when they find the perfect home for their treasures, understanding space and the rule of 3 with limited effort. Or, there's the other end of the scale... the overwhelmed - the type who are completely daunted by every square inch of shelving and space to fill, either leaving them empty or filling them to the brim.
Conversations in store have made us realise that many of our customers and followers are the latter. Styling feels stressful and scary (not to mention expensive) and they just don't know where to start. So - the Frankie Say Relax 'How To' Styling Series was born, where we give you our best tips and tricks on styling those pesky open shelves in a well balanced, meaningful way.
First things first - it is not about buying a million new things to make the shelves a matching, cohesive display. The secret to styling is authenticity, using your treasures you have collected over time, the kids ceramic attempts, coffee table books and novels, plus family photos, artwork and anything else that needs to be stored safely or that brings a smile to your face.
So, with this in mind - read on for a blow by blow recount of how we styled these shelves, plus head to our Instagram for a speedy video, showing how it came together.
How To - Style Open Shelves.
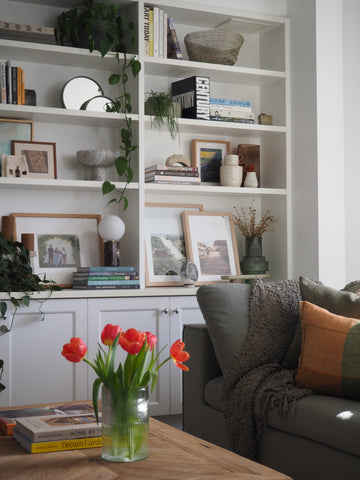
1 - Consider all of your bits and pieces you would like to use in your shelving, especially your mix of textures and sizes, plants if you have any as well as books.
2 - Start by identifying the bigger items that might sit alone, as opposed to sitting in a grouping of items and place them on the shelves. It might help you to try and have a grouping, as well as a singular item on each section of the shelving, this will help with keeping it balanced and spatially considered.
3 - Are there any modems or power plugs you want to cover? You can place some artwork or a framed photo here to keep that looking neat. Sometimes things like this help to set the foundation of the shelving. Also, don't be afraid to layer prints or photos here if space permits, you can see we have done this multiple times on this occasion.
4 - Stacks or groupings of books are handy when setting your shelves to ensure there are varying heights throughout. You'll see in this case, we have used book ends for one grouping, stacked the books by colour in two other sections, as well as effortlessly leaned books elsewhere, kicking one out away from the books to keep them from toppling. Book stacks are handy to then highlight a smaller item like a vase or sculpture, or to elevate a table lamp.


5 - The key with grouping items together is to always consider heights and textures. Larger items sit at the back, with the smaller items sitting forward. Consider 3, 4 or a simple 2 item grouping here with glass, ceramic or resin. These groupings are a perfect way to include candles, smaller vases or anything with a bit of character.
6 - Adding an organic element really helps to top off your shelving. Think a hanging plant like Rhipsalis or Devils Ivy, some foliage cut down from the park and placed in a vase, or even a singular flower, sitting in a bud vase to add some seasonal colour.
It is important to have fun with your styling endeavours and to not think about it too hard or it will show. It's about the things you love having a place to shine, not about living in a perfectly curated display home. Good luck!
